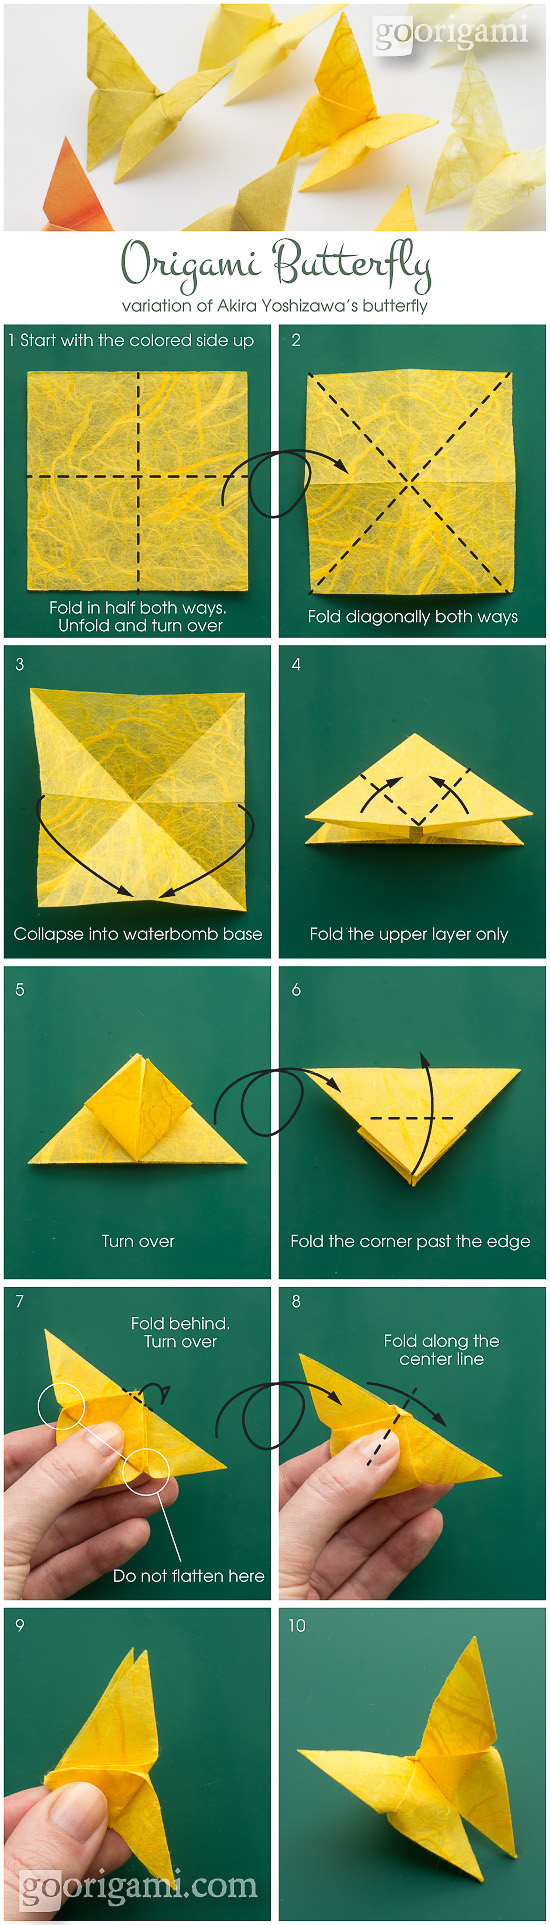
Origami Butterfly
| Name: | Origami Butterfly — 3D Variation |
|---|---|
| Designer: | Akira Yoshizawa |
| Paper ratio: | square |
| Paper size: | 8.5 cm |
| Model size: | ~ 6 cm |
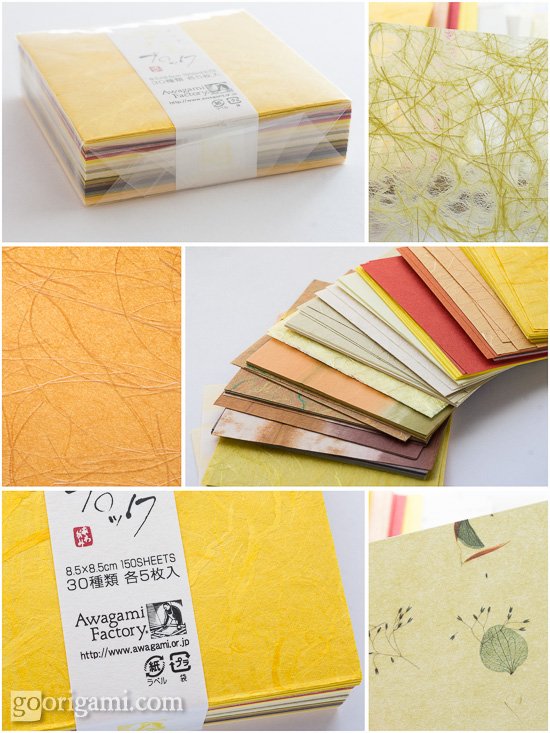
| Paper: | washi paper, Japan |
Today is the 101st birthday of Akira Yoshizawa, the great origami master and the father of modern origami. You have probably noticed that Google marked the occasion with a special origami doodle created by Robert Lang!
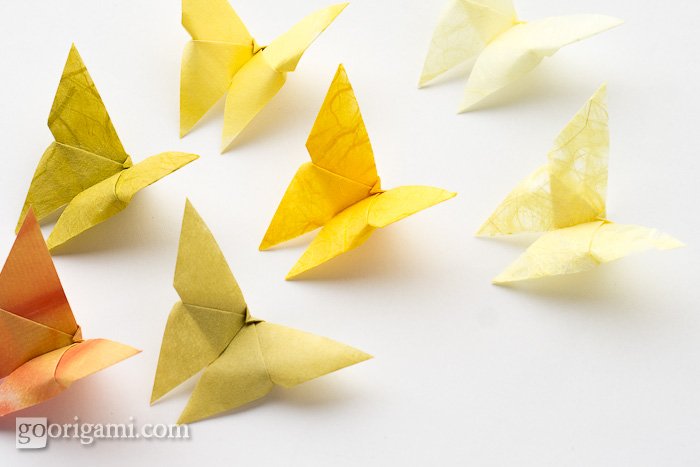
Why not celebrate the event by making your own origami butterfly?! Here is a step-by-step tutorial for a 3-d variation of a classic butterfly by Akira Yoshizawa (first spotted on Nick Robinson’s blog), enjoy!
UPD. A few people have asked me about the paper I used to fold those butterflies, so I thought I’d update the post with some photos. It was a set of traditional Japanese washi paper (brought to me from Japan). Try the producer’s web page — Awagami Factory to find out if it’s available in your country.
Tags: Akira Yoshizawa, Animals

Thank you for sharing this tutorial. I didn’t know that todays doodle was made by Robert Lang. It’s good to know. Yours models are perfect as usual – excellent paper and folding. Greetings Natalia :-)
Very lovely butterflies and composition! And thank you for the variation :).
very easy butterfly for kids
Ой, спасибочки, надо и себе таких сделать!
Какие они милые
Wonderful butterfly!
i love it
so MUCH
I love this site…thank you so much. I was given a whole pack of Origami paper and can now play…play…play thank you so much!!
Прекрасные бабочки!
I got it right after 4th time ^^
Found this via Pinterest. Seems very easy to do and in any case this looks great. This might drive me to origami :)
I too found out by pinterest
Loved the step by step …until u got to step 9! I was right there with u & then step 9 just showed fingers and then right on to step 10? Sorry, but i’m a beginner & maybe i’m missing something really obvious but it IS step by step directions…could u explain how u got to step 8 & then how u made it look like step 10!
After step 7 (when you folded little corner behind) you turn the model over. Picture 8 shows what you’ve got.
At step 8 you are supposed to fold the model in half along the central line (valley fold). And that’s basically it.
Step 9 just shows the model from the side at this point. Press the butterfly really well in the middle.
And step 10 shows how it looks from above. Ready to fly:)
Hope it helps!
Got it….that helped, thanks
lo siento no pude entender el paso 9 y 10 fui haciendo tal como explican en paso 1 a 8 hasta ahi llegué. por favor explique con foto ya que creo que falta un paso entre 8 y 9, gracias
I had the same problem, yours look so much beter than mine, i think because im using the regular oragami paper. yours are so beautiful. going to try some more…
yes
Hey, I’m with you j! I have done origami, but I didn’t get the finished look after step 9 either. There needs to be a step to say what to do to make it look like step 10. Could we please have step 9.5??
the same question for me !
Definitely a great variation for Yoshizawa’s butterfly.. makes the butterfly look so lively!
FOUND THESE NOT ONLY EASY BUT REALLY BEAUTIFUL WHEN DONE….. THANKS!!!!
I agree with others what do you do after step 9 ? All instructors were good until the end
I thought that the whole thing was very easy including step 9
I love the simplicity of this piece, and how much it looks like a butterfly. Thanks for sharing!
Thank you ever so much for sharing your tutorial, it is really appreciated. Kindest regards
thank you for the tutorial…I tried them and got it right first time :)
It went great until step 6 and 7… I don’t know how I went wrong but I went very wrong. :(
a cube of multi colored nonstick notes, a little fishing line, some straws or wire, and some hot glue to attach the string to the butterflies and you have a cute little mobile!
muchas gracias, la mariposa es preciosa, la usaré en mis trabajos, saludos.
Thanks for lovely tutorial. I am pinning this to Pinterest to spread your butterflies there.
I have made these in se real sizes and loved them. Next I am attempting to make them out of 36 & 48 inch paper, to hang from a skylight for a retirement party. Thanks for the great instructions
This is so Cool, Love it !!
Love this. My first attempt at origami and I’m hooked. Thank you!
Origami is very addictive stuff! :)
Looks easy. Isn’t.
This was great! I just made it and posted a picture with your link to my blog!
Can I ask where you got this beautiful paper. I tried to find it under washi paper but could not find this particular one you used.
My husband brought this paper to me from Japan. Here is a photo on Flickr.
I don’t know if one can buy it online, try http://www.awagami.com to find out!
Thank you for great instructions, the butterflies look very cute and beautiful!
L O V E! Abslutely loved this tutorial! I’m a beginner at origami and the instructions were so easy to follow! I was just wondering where I can get hold of the paper used in this tutorial and what it’s called? I love the sheer look and the shifting colours! Thank you!
Hi Pip – I’ve just updated the post with some information about the paper I used.
I didn’t understand how it goes into the butterfly I don’t everything but 9 was where I got lost
Step 9 is not a real step (that’s why there is no directions there), the photo just shows the result of step 8. I guess it might say “Press really hard” but no more than that:)
Check if you turned the paper over between step 7 and 8.
There also was a similar comment somewhere above asking the same thing, check this out too.
Nice.I loved it.Thank you:)
VERY NICE
THANK YOU VERY MUCH
VERY ATTRACTIVE AND USEFUL
GOOD LUCK
Thanks for the tutorial! My kids and I had fun making butterflies today :)
thank you very much for explaining the steps for making of butterfly and request you to show more origami work in easy steps, Good Luck!!!
I checked the washi factory website that was linked above. But, I was wondering exactly what type of paper he used to do the tutorial.
There is a photo in the post where you can see how the label looks like. I didn’t buy this paper from the website and I don’t know if it’s available there. Just show them this picture and ask.
Love these little butterflies! I find origami so calming, and the look so perfect on cards.
Ļoti skaisti un viegli salokāmi tauriņi! Paldies!!!
WOW! I’s very very very good butterfly
I was looking for an easy origami butterfly and found this via Pinterest. Thank you so much for sharing this great tutorial. <3
Thank you! I was looking for an easiyish, yet nice looking origami project for the kids where I volunteer.
This is so awesome! I made one as a sample out of simple yellow paper and set it on a table while I did other things. The kids noticed it just sitting there and were begging to make it!
What I like is that it is easy enough for the young kids to manage, and the result interests the older kids. Win all around. Thank you!!!!
>>easy enough for the young kids to manage, and the result interests the older kids. Win all around.
I couldn’t agree more) I’ve taught this model to both kids and adults – it always goes great!
9th step is bit confusing. hope you can make it little easier for kids
Gorgeous butterfly. I was wondering was type of paper you used but you included the answer. I thought the name of the paper was “rice paper” because of its transparency and texture. I wish I could have some. Keep on doing beautiful origami stuff.
Rice paper is a term which is used sometimes for some varieties of washi paper (usually white). The funny thing is that it’s not made from rice, as one might think. Traditionally this paper was used to pack rice, that’s how the term was born – or so I was told:)
Hi, i would like to use your diagram for my origami blog on how to fold this elegance butterfly. Thank you in advance.
Sure, feel free to share – just include a link back to this page:)
Yes i will. Thank you :-).
Thank you very much for the tutorial. I have made a great christmas gift:)
wt is water bomb
http://www.origami-instructions.com/origami-waterbomb-base.html
hice las mariposas para ponerlas de adorno a unas materitas que se ponen en venta
I was pretty bad, above the wings were not like the photo, mine are flattened… not raised: (
my favourite butterfly model
Thank you!
Great directions.
SUCH A EASY AND WONDERFUL BUTTERFLY AND THANK YOU FOR WHO EVER MADE IT
I’m not seeing how you open it up….
I’m using this website to make a how-to essay for my school.
very easy and beautiful origami butterfly… thanks.
Thank you very much! This will serve as a beautiful way to deliver a birthday gift.
Thank you!!! This looks so good in my room!😁
you are so talented, so excellent!
I loved it so much
I guess I am dumber than “kids” because I cannot make the step 9 transition either
Step 9 just shows the result of step 8, which is the last step of the folding sequence.
amazing website love it so much i still cant do it tho
yup I just did it
amazing i have alredy made 30 of them
I love origami insects and birds
same!
I love these and literally can’t stop making them!
Can I use this as an example for a project I am doing for my library. Thank you!
This is a great butterfly for all sorts of deco. and crafts!!! Thanks SO much for posting this!!
it is very hard
I had some trouble as I didn’t have the sheet which you used to make it that’s why I got it all white
Not sure what you mean by Waterbomb in step 3
The butterfly is so beautiful.
the butterfly is so cool i made it for my sisters birthday and she loved it
i love this so much im making it for a friend
Just found this post again, I just wanted to say that I have been making these for years now, I’ve used them to decorate my walls I’ve left them as little presents in bars or elsewhere, I’ve thaught, my kid cousins, how to make them, so thank you for sharing.
I just started to learn how to make an origami butterfly
Love it! Although it looks very triangular 🤨
I love this I just needed to refresh my brain I used to make these all of the time. All of the comments are from back when I was born so I figured I would update it in 2023 lol just to know that your website is still going Love it thank you for helping me refresh my brain
Great but a video would help a lot.